Tuesday, November 27, 2012

Carrot/Cheesecake Poke Cake


You'll need three things.

1 box Carrot Cake mix
1 box No Bake Cheesecake Mix
1 8oz tub of Cool Whip.

THAT'S IT!

Besides the ingredients to make the cake (water, oil, eggs) And cheesecake (milk) that is all you need to make the MOST DELICIOUS CAKE EVER!!

Mix the carrot cake according to the directions. Pour into a 9x13 (buttered) pan. Bake. Let cool. Then poke (use the top of a wooden spoon handle) the entire top of the carrot cake (sorry no picture) Just go across & back & forth making a hole every 1/2 inch or so. The more holes, the more it seeps into your cake, so there are no losers here :)
Then mix the cheesecake according to the directions and IMMEDIATELY pour on top of the carrot cake. It will be runny. That is good. Make sure it goes into all the holes. You can move it around with a knife to ensure it does. Mine wanted to run to the edges of the pan, that's OK too, just as long as you "pull" it back from the edges into the holes.
Let that cool in the refrigerator for about a half hour.
Then put the entire tub of Cool Whip on top & return to refrigerator to cool  for a bit.

And that's IT!


Here it is, in all it's yummy glory.

If you love carrot cake AND love cheesecake, like I do....This cake will knock your socks off!

It is even better after it has sat in the refrigerator overnight.

I found that out this morning when I cut a piece for my breakfast! Hey, it has milk & eggs in it, right? :)

Sunday, November 25, 2012

DIY Liquid Soap

First off let me say...I am in no way trying to imply I am "making soap", officially. That is a HUGE undertaking that requires YEARS of practice, experimentation, & patience.

All I'm doing is showing you how to stretch a buck by taking already existing, cheaply bought, solid soap & turning it into liquid soap, therefore saving you A LOT of money.

I also want to say I get all my recipes & ideas from other blogs on the Internet. There is a buttload of information out there from very smart people that have been doing this for years, so all I am doing is coping recipes. If you can read, you can make mine or any other person's "concoctions".

That being said, let me show you my project this weekend....

DIY LEMON VERBENA LIQUID SOAP

Liquid hand soap, we all have gotten used to using it. Somewhere along the way hard, squishy, messy, bars of soap were replaced with this easy stuff. BUT I looked around my house recently, trying to assess what I spend the most amount of money on & how I could start to make it myself, cheaper & I realized liquid soap was one of the things I spend a FORTUNE on. So, I started looking for alternatives.

The recipe I used this weekend was one of the easiest, and most cost effective I've found.
I love using lemon scented soap in the kitchen, or just in general. It neutralizes a lot of stinky things I cook with & I think any citrus smell equals clean in my brain, for some reason, but that's just me. I have a bar soap I really like & it was recently on sale at the dollar store for $1 a piece. You certainly can find whole packs of soap for $1, so the TYPE of soap is not as important as the AMOUNT. Also, soaps with too high of a fat content (like Dove) are said to not work well. I do not know if that is true, since this is my first batch. I do plan on tackling a more luxuriant body wash recipe next weekend, so I'll let you know.

Also, this recipe is for a GINORMOUS amount of soap, so you can certainly cut the whole thing in half if you don't have a pot big enough.

WHAT YOU WILL NEED
16oz of soap. (I used 4 4oz bars)
cheese grater
72cups of water
21 quart stock pot
funnel
5 empty gallon jugs

This is the soap I chose. I REALLY love Yardley soap. But again, you can use whatever YOU like.

Grate.

...and grate...

And GRATE...until you end up with a nice big pile like this. This is the most time consuming & slightly tedious part of this whole process & it only takes a total of 5 min.'s TOPS..I think saving big bucks is worth 5 minutes of work.

When you have grated all your soap, put the pan on the stove & add 24cups of water.
Put the heat on medium, and just stir until all the soap pieces have dissolved.

It will look like this at this stage. Very thin liquid with froth on top.

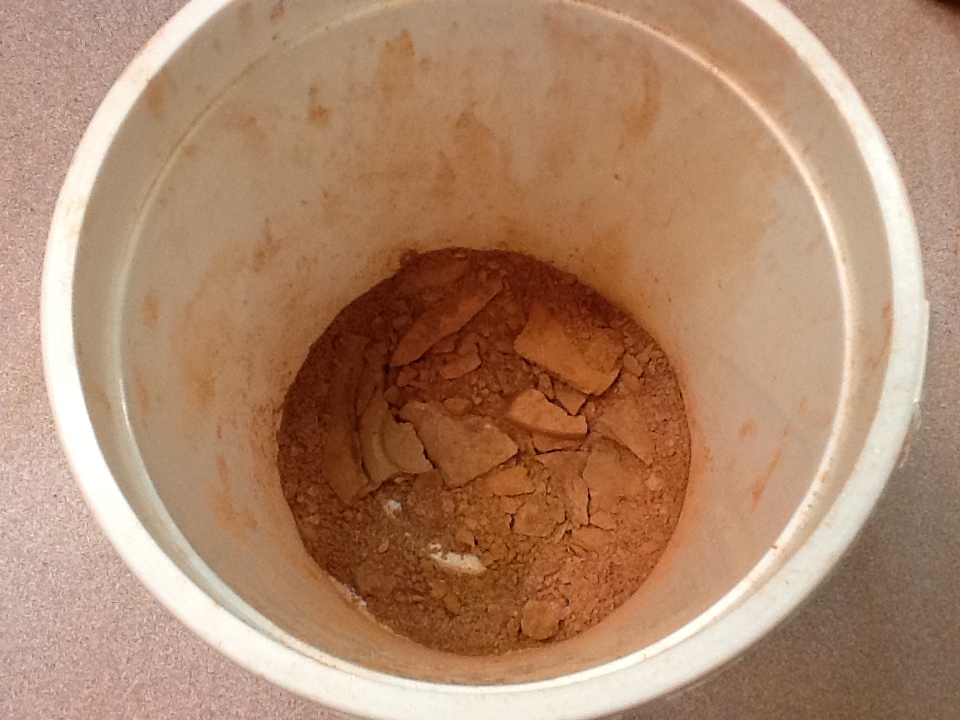
Now you let this sit for at least 8 hours. Overnight is best. I set mine outside last night & it was cold enough to have snow flurries, so putting it in a very cool place would be your best bet to get it to solidify quickest.

I'm sorry to say, it was very early when I went out to get my now "gel like" soap mixture, and I forgot to take a picture. It will be like a harder jello consistency.

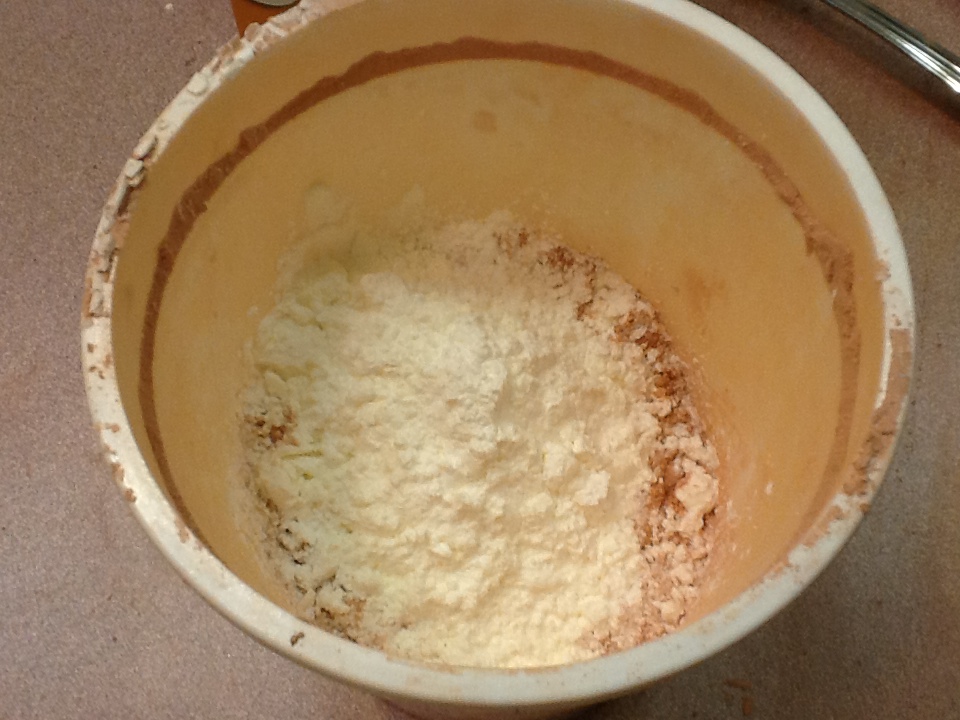
You then put the pot back on the stove and add another 24cups of water & turn it on medium heat. Start to break up the gelled soap with your fingers into the water. When you get a good amount of it broken up, add the last 24cups of water.

As you heat it back up, it will look like this. Just stir & stir until all the chunks have melted back into a liquid (I kept reaching in and squishing the chunks into smaller bits until it got too hot to do so). Turn off the heat & allow to cool. This pot is HUGE, so there is no moving it at this point. You just have to let it sit where it is, be patient & let it cool.

This is all of it, in it's glory, melting back down to a liquid in my giant 21 quart stock pot.

After it is cooled it will have a "snot like" (sorry, it's truly what it looks like) consistency. Now you can put it into any storage containers you like. My husband is a milkaholic, so I just used 5 of the BAZILLION empty milk jugs I have.
 
Some blogs tell you to use distilled water for this whole process, I chose not to. But for that reason, I also suggest you try to use it within a year in case of bacterial growth. I didn't get my initial soap mixture up to boiling (I don't think it's recommended, actually), but it did get down to freezing temperatures outside overnight, so I feel pretty confident it won't grow mold. Be aware this COULD happen though & take into consideration if you would prefer to not chance it & fork out the extra dough for 72cups of distilled water, OR spend the time boiling fresh water first & letting it cool to use later...Whatever you chose, is up to you. I took the easy/cheap way out this time, and have labeled & dated the jugs to ensure I rotate old to new & not let them go past a year.


So there you have it. Almost 5 gallons of liquid soap for $1.13 a gallon.
I will update this blog as to how long these last.

Hope you give it a try! :)

Sunday, November 11, 2012

Money Saving Face Powder and Blush

I am a hairdresser, so I have access to cosmetics that have either been discontinued, the company has changed the packaging & made perfectly good cosmetics obsolete, or we at the shop change brands that we want to sell, leaving us with left over stock.
Well, most of the time, the colors are too dark for my fair English skin, so I pass them up. But I recently saw a blog where a girl made me have a DUH moment. Most face powders are 90% corn starch! YES CORN STARCH. The stuff you make gravy with. Sooooo I had an idea. Why not take all those unwanted powders, combine them all, mix in corn starch, and see what I get. Couldn't hurt, right? No one was claiming them.
So that's just what I did.
These are an assortment of powders. Some were my own, almost gone, collecting dust & taking up room in my cosmetic box. Some were very expensive, high end powders that no one else wanted, from work. You'll notice one was even a shimmery bronzer type powder. I threw that in as well...again...couldn't hurt!
So, this is all of them, plopped into a container. Doesn't look like much, but if you look at the above picture, there was one that was super dark, so I figured I would have enough pigment to get a really big amount.

So then I just started to slowly add in the corn starch. Little by little. Putting the lid on & shaking like crazy, (let the dust settle a bit before taking the lid back off) testing the shade every so often on my arm. Now, remember, you can ALWAYS add more corn starch, so there is no need to rush this. Just have patience & keep going.
So this is where I decided to end. I think I may need to go a bit lighter, but I want to wait until I try it tomorrow morning for work.

The amount of powder I got really surprised me. I used a pint container, and it filled it just about 3/4 of the way up! Plus, I think there was one more dark shade at work no one wanted, so I may be adding even more. I think I could have a full pint OR MORE before I'm done. And since I only wear makeup 4 days a week when I have to go to work, I think this will last me a VERY long time. I can't gauge the cost of this, but considering the powders from work can range anywhere from $25 to $45 (and FREE for me!), and a 16oz box of cornstarch cost a little over a buck, I think you can do the math.

This opens up the possibility for you to maybe buy a very dark powder, to get the amount of pigment you need, then mix it up with the corn starch & end up getting BUCKETS more! Talk about bang for your buck!!
And don't throw away all your empties, because you'll need a littler container to keep in your purse, or to make up some varying colors. You could keep some darker for summer tans, or keep one more shimmery for nighttime. In any case...Don't throw anything away! Are you crazy?! Ha Ha Ha


So then.....

I started looking at all the different blushes I had! All the colors I bought over the years, that after I got them home & tried them I looked like a blushing CLOWN. I thought, "If it worked for the face powder, it must work for blush too, right?"
And it did!
These are all my half used, never used, have no idea what I was thinking, bits of blush.
Same process...crush that up, then add corn starch SLOWLY. Lid back on, shake shake shake...

And there you have it! The perfect shade of rose I've searched my whole life for! Again, the real test will be when I do my makeup in the morning, but all I have to do is dump in a bit more corn starch. It's not like it's rocket science...:)

I hope you found this helpful & it gave you some ideas about consolidating some unused powders and blushes. Or just gave you ideas about maybe buying that darker shade & getting a lot more product from it...Either way, just thought I'd share my messy fun for the night :)


DIY Dry Laundry Detergent

This was a very simple Sunday project. It took a total of MAYBE 10 minutes.


Just grate the soap, pour all the dry ingredients into the bucket, tightly put the lid on, and mix away.

You can lift to mix, roll it, turn it upside down…whatever works.

I also opened it up & mixed it a bit with my hands, just to be sure all the soap from the bottom was not sticking.


1 (4 lb 12 oz) Box of Borax


1 (3 lb 7 oz) Box of Arm & Hammer Super Washing Soda


1 (3 lb) Container of OxyClean


3 (5 & 1/2 oz. Bars of Fels Naptha Soap


1 (4 lb) Box of Arm & Hammer Baking Soda


1 (55 oz) Bottle of Purex Crystals Fabric Softener


I was able to find all of these products together in the laundry department at Walmart. I know for sure that if you can’t find them there or in any other store around you, they have them all on Amazon.com

A 5 Gallon bucket (with lid!)


Grating the soap. This was the only “labor intensive” part of this. And it really wasn’t at all. I had the luck of finding a grater that fit right over the side of my bucket, with an easy grip on top. I suggest the fine grate side, and just go to town. Takes 5 minutes…TOPS!
Awww look how pretty!
I suggest saving the scoop out of the empty OxyClean bucket to make for easy filling into whatever container you use.
The empty Purex bottle is perfect for filling & using in the laundry room if you don’t want to have a ginormous bucket sitting there. It also has handy measuring lines in the cap. The middle line is all you’ll need for a normal size load
I took the outside label off, so I could see any settling. I suggest not filling it completely, so you have some room to shake it up before each use.

So, that's it! Very easy & a HUGE money saver!  I will post an update when I know exactly how long this lasts & just HOW cost effective it was.

I've done some loads of laundry already & I can say that it cleaned everything very well. Even my husband's work jeans! The towels came out of the dryer very soft & fluffy & smell AMAZING!
All the laundry just smells, looks & feels great!
So, no more fabric softener, no more Bounce sheets! YAY!!!! This will save me a fortune!
I hope you give it a try. It really is super easy :)


***2015 CHANGES TO THIS ORIGINAL RECIPE***
*Changed to 5.5lb OxyClean
*Changed to 2 bars of Zote White Soap instead of Fels Naptha
*Added a small Downy Unstoppables (any smell you like) in addition to the Purex

COST
Borax...$3.97
Washing Soda...$3.97
Baking Soda...$2.24
OxyClean...$9.47
Zote...$1.50 (.75 each)
Purex...$8.96
Unstoppables...$6.97
TOTAL...= $37.08

This blend lasts me AT LEAST 9 months, so that is $4.12 a month.